mmdetection - tutorial (2)
mmdetection
tutorial (2)
mmdetection - tutorial (2)
mmdetection 설치 후, config 파일에 대해 스터디했다.
mmpretrain 과 유사한 것 같은데, 아직 잘 모르겠다.
이번에는 사전 학습된 모델을 가지고 inference 하는 방법에 대해 알아보자.
그리고 mmdetection에서 제공하는 데이터셋과 다운로드 방법에 대해 알아보자.
High-level APIs for inference - Inferencer
Basic Usage
DetInferencer를 import 해서 아래와 같이 inference가 가능하다.
주석 처리된 부분은 mmdet에서 제공하는 모델을 확인하는 것과 config, checkpoint를 적용하는 코드이다.
from mmdet.apis import DetInferencer
# Initialize the DetInferencer
inferencer = DetInferencer('rtmdet_tiny_8xb32-300e_coco')
# Perform inference
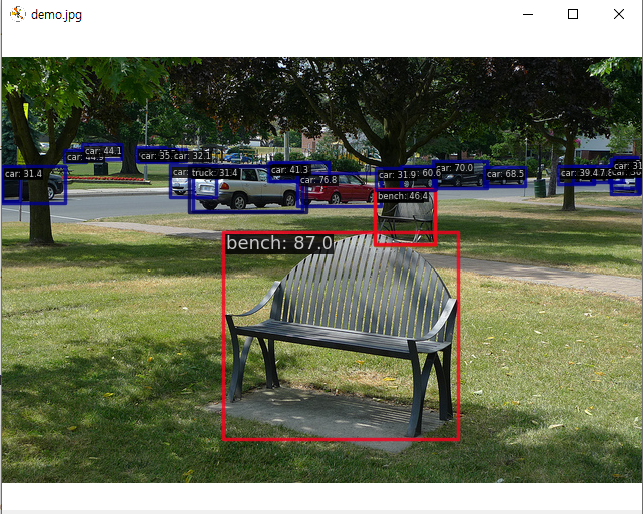
inferencer('demo/demo.jpg', show=True)
"""
inferencer = DetInferencer(model='rtmdet_tiny_8xb32-300e_coco')
# models is a list of model names, and them will print automatically
models = DetInferencer.list_models('mmdet')
inferencer = DetInferencer(model='rtmdet_tiny_8xb32-300e_coco', weights='path/to/rtmdet.pth')
"""실행해 보면 아래와 같은 결과를 보여준다.
Device
아래 코드와 같이 gpu, cpu를 지정해 줄 수 있다.
inferencer = DetInferencer(model='rtmdet_tiny_8xb32-300e_coco', device='cuda:1')

inferencer = DetInferencer(model='rtmdet_tiny_8xb32-300e_coco', device='cpu')
Inference
# str: Path/URL to the image.
inferencer('demo/demo.jpg')

# array: Image in numpy array. It should be in BGR order.
import mmcv
array = mmcv.imread('demo/demo.jpg')
inferencer(array)

# list: A list of basic types above. Each element in the list will be processed separately.
inferencer(['img_1.jpg', 'img_2.jpg])
# You can even mix the types
inferencer(['img_1.jpg', array])

# str: Path to the directory. All images in the directory will be processed.
inferencer('path/to/your_imgs/')
Output
dictionary 형태로 prediction 결과를 반환한다.
{
      'predictions' : [
        # Each instance corresponds to an input image
        {
          'labels': [...],  # int list of length (N, )
          'scores': [...],  # float list of length (N, )
          'bboxes': [...],  # 2d list of shape (N, 4), format: [min_x, min_y, max_x, max_y]
        },
        ...
      ],
      'visualization' : [
        array(..., dtype=uint8),
      ]
  }
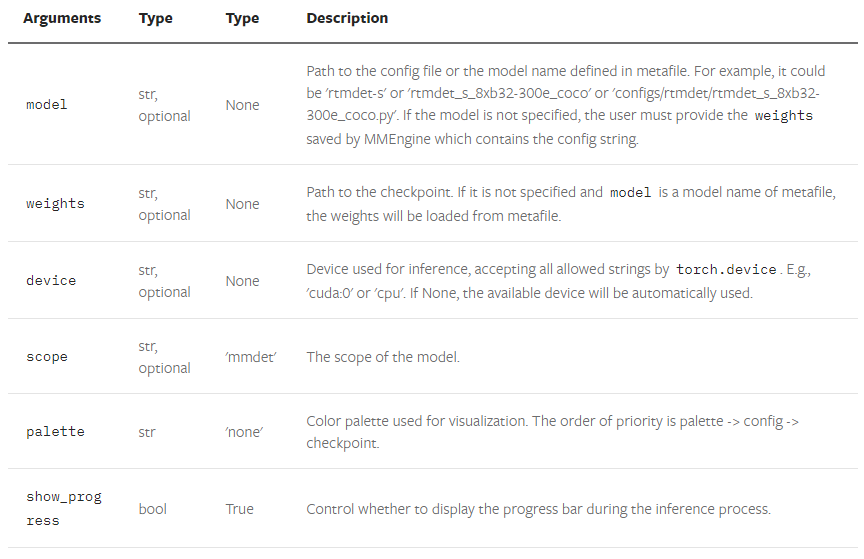
API
- DetInferencer.__init__()
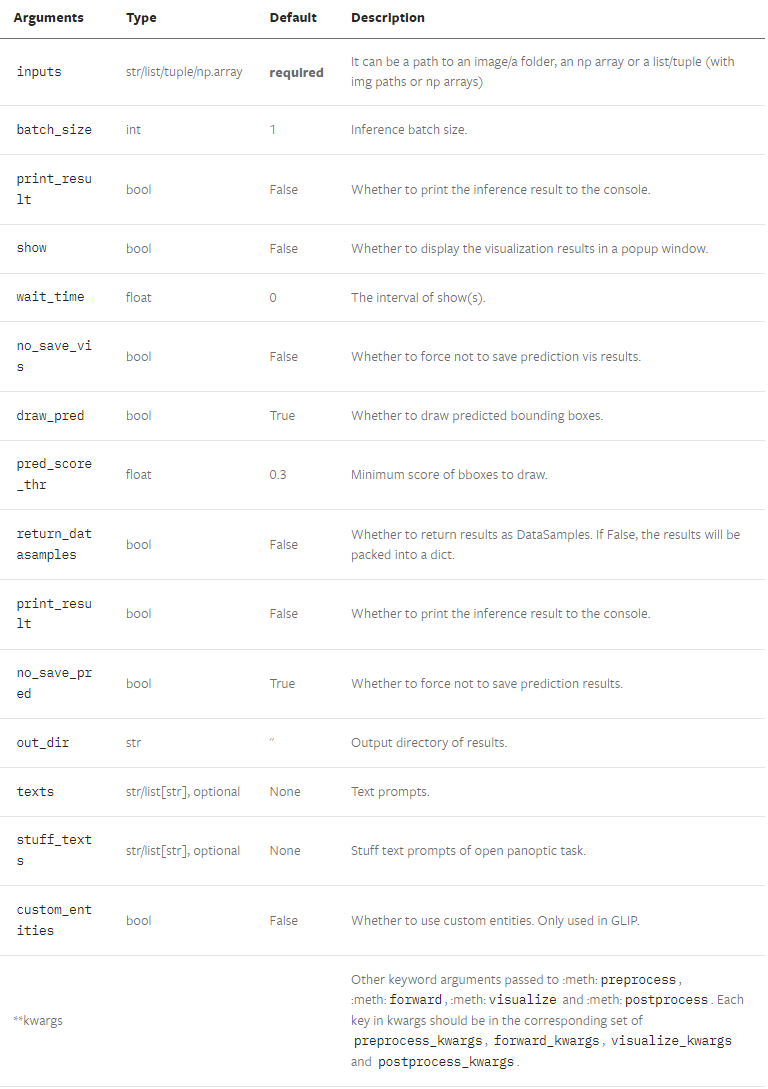
- DetInferencer.__call__()
Demos
documents에 image, webcam, video, large-image 등에 대한 demo를 테스트해볼수 있다.
Multi-modal algorithm inference demo and evalutaion
자세한 내용은 문서를 참조하자.
지금까지 documentation에 있는데로 inference 하는 방법에 대해 알아보았다.
이제, Dataset 을 준비하는 방법에 대해 알아보자.
Basic Detection Dataset Preparation
mmdetection은 COCO, Pascal VOC, CityScapes 등의 데이터셋을 지원한다.
아래의 명령어를 사용해 지원하는 데이터를 다운로드 받을 수 있다.
python tools/misc/download_dataset.py --dataset-name coco2017중국 OpenDataLab에서 더 많은 데이터도 다운 받을 수 있다.
데이터는 원하는 위치에 다운로드 받아서 $MMDETECTION/data symlink 로 연결해 주면된다.
나는 그냥 mmdetection 폴더에 data 폴더를 생성해줬다.
COCO Caption Dataset Preparation
아래의 명령어로 COCO2014 Dataset 을 다운로드 받았다. 시간이 꽤 걸린다.
python tools/misc/download_dataset.py --dataset-name coco2014 --unzip그런다음 아래를 실행하여 annotation 파일을 다운로드 했다.
cd data/coco/annotations
wget https://storage.googleapis.com/sfr-vision-language-research/datasets/coco_karpathy_train.json
wget https://storage.googleapis.com/sfr-vision-language-research/datasets/coco_karpathy_val.json
wget https://storage.googleapis.com/sfr-vision-language-research/datasets/coco_karpathy_test.json
wget https://storage.googleapis.com/sfr-vision-language-research/datasets/coco_karpathy_val_gt.json
wget https://storage.googleapis.com/sfr-vision-language-research/datasets/coco_karpathy_test_gt.json
데이터와 annotation 파일을 다운로드 받으면 아래의 데이터 폴더 구조가 된다.
mmdetection
├── data
│   ├── coco
│   │   ├── annotations
│   │   │   ├── coco_karpathy_train.json
│   │   │   ├── coco_karpathy_test.json
│   │   │   ├── coco_karpathy_val.json
│   │   │   ├── coco_karpathy_val_gt.json
│   │   │   ├── coco_karpathy_test_gt.json
│   │   ├── train2014
│   │   ├── val2014
│   │   ├── test2014
COCO Semantic Dataset Preparation
COCO semantic segementation 에는 카테고리 이름 정의가 다른 두 종류의 annotation 이 있다.
첫번째는 stuffthingmaps 데이터셋을 직접 사용하거나,
두 번째는 panoptic dataset을 사용하는 것이다.
대충 이해하기로는 첫번째 혹은 두번째 데이터가 차이가 있기 때문에
그것에 맞게 설정해줘야한다는 내용이다. 자세한건, documentation과 COCO 데이터셋 홈페이지
(https://cocodataset.org/#home) 를 참조하자.
RefCOCO Dataset Preparation
RefCOCO 데이터셋은 객체를 식별하고 참조하는데 사용되는 데이터셋이다.
예를 들어, 'the person in ther red shirt' , ' the cat on the left' 와 처럼 객체 식별과 설명하는 문장 생성 관련한
데이터셋이다.
아래와 같은 명령어로 다운도르 가능하며, 데이터셋 구조는 아래와 같다.
python tools/misc/download_dataset.py --dataset-name refcoco --save-dir data/coco --unzipdata
├── coco
│ ├── refcoco
│ │ ├── instances.json
│ │ ├── refs(google).p
│ │ └── refs(unc).p
│ ├── refcoco+
│ │ ├── instances.json
│ │ └── refs(unc).p
│ ├── refcocog
│ │ ├── instances.json
│ │ ├── refs(google).p
│ │ └── refs(umd).p
│ │── train2014
ADE20K 2016 Dataset Preparation
대규모 시멘틱 세그멘테이션 데이터셋으로,
150개 이상의 객체 및 장면 클래스로 레이블이 지정된 이미지를 포함하는 데이터셋이다.
이 데이터도 위에처럼 명령어로 다운로드가 가능하다.
Reference
https://mmdetection.readthedocs.io/en/latest/user_guides/inference.html
https://mmdetection.readthedocs.io/en/latest/user_guides/dataset_prepare.html