mmpretrain 적용
CIFAR10
mmpretrain 적용 - CIFAR10
mmpretrain 스터디를 했으니, 실제 데이터를 적용해보았다.
Dataset
적용할 데이터셋은 CIFAR10 데이터셋이다.
CIFAR10 데이터셋에 대해 정리한 내용은 아래와 같다. ( https://www.cs.toronto.edu/~kriz/cifar.html )
| 총 이미지수 | 60,000장 |
| 이미지 사이즈 | 32 x32 |
| classes | 10 |
| class 당 이미지 수 | 6,000 |
| train image 수 | 50,000 |
| test image 수 | 10,000 |
| classes name | airport, automobile, bird, cat, deer, dog, frog, horse, ship, truch |
checkpoints 파일 다운로드
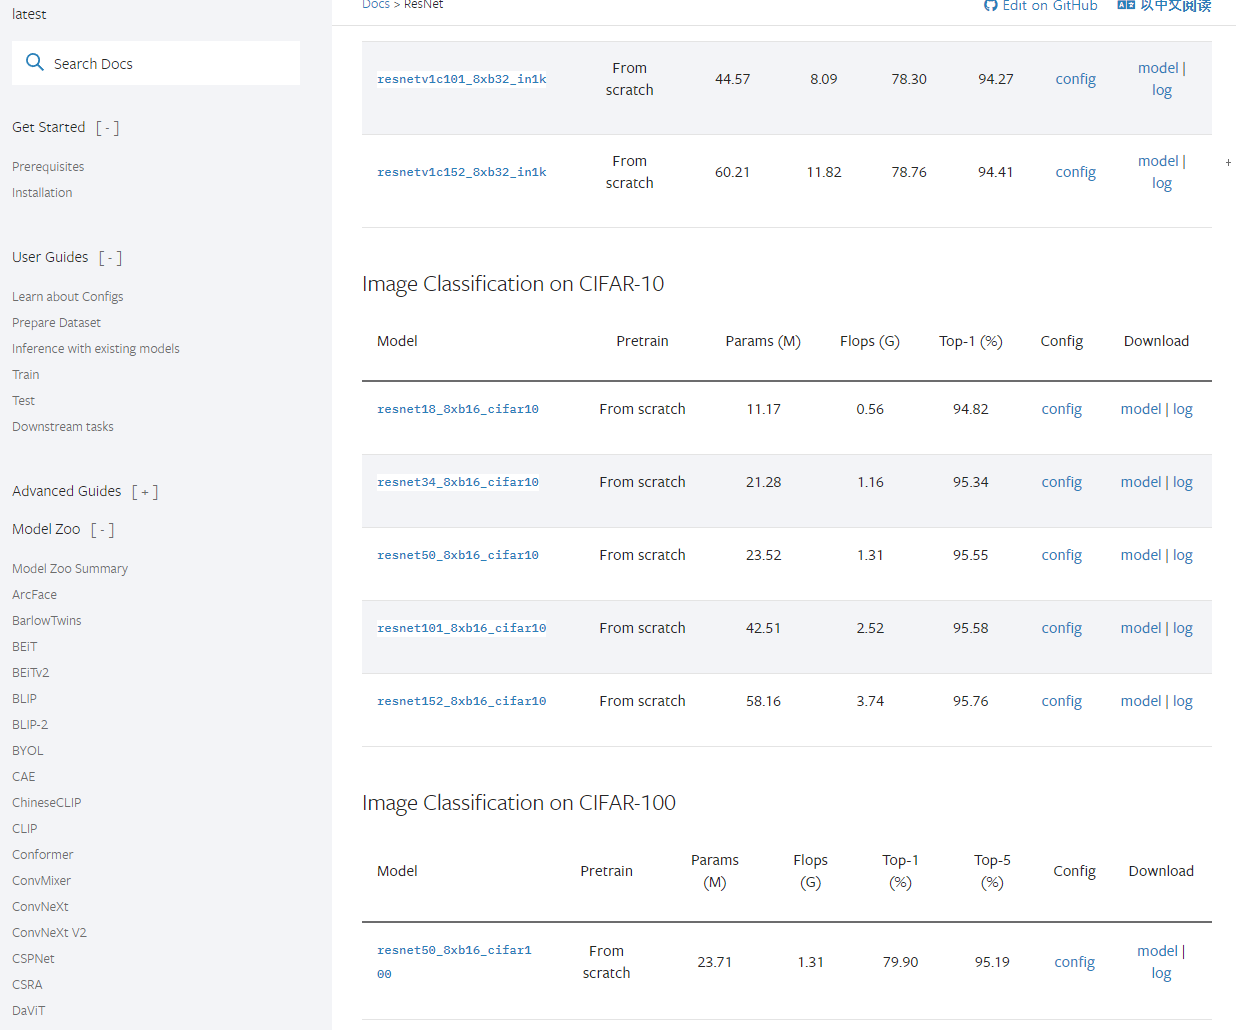
mmpretrain documents 나 github에 보면 다양한 모델들을 지원하고 있다.
아래는 documentation에 있는 Model Zoo의 내용이다.
나는 resnet18_8xb16_cifar10 모델을 다운로드 했다. 그러면 .pth 파일이 다운로드 된다.
mmpretrain 작업폴더에 checkpoints 폴더를 하나 생성해주고, 그곳에 다운로드 받은 파일을 넣어준다.
Config 파일 생성 및 수정
mmpretrian/config_work 폴더를 생성해준다. 이름은 각자 알아서.
아까 .pth 파일을 다운로드 옆에 Config가 있다.
이걸 클릭해주면 해당 모델의 github 파일로 이동한다. 아래와 같이 있을것이다.
_base_ = [
    '../_base_/models/resnet18_cifar.py', '../_base_/datasets/cifar10_bs16.py',
    '../_base_/schedules/cifar10_bs128.py', '../_base_/default_runtime.py'
]
해당 파일들을 내용을 하나의 파일을 생성(resnet18_b16x8_cifar10_config.py) 해서 다 작성해주고, 필요한 부분을 수정해준다.
각각의 해당 파일에 해당하는 부분을 찾아서 수정해줘도 되지만 그러면 나중에 복잡해지고 헷갈린다.
아래는 위의 4개 파일을 전체 합친 Config 파일(config_work/ resnet18_b16x8_cifar10_config.py)이다.
# model settings
model = dict(
    type='ImageClassifier',
    backbone=dict(
        type='ResNet_CIFAR',
        depth=18,
        num_stages=4,
        out_indices=(3, ),
        style='pytorch'),
    neck=dict(type='GlobalAveragePooling'),
    head=dict(
        type='LinearClsHead',
        num_classes=10,
        in_channels=512,
        loss=dict(type='CrossEntropyLoss', loss_weight=1.0),
    ))


# dataset settings
dataset_type = 'CIFAR10'
data_preprocessor = dict(
    num_classes=10,
    # RGB format normalization parameters
    mean=[125.307, 122.961, 113.8575],
    std=[51.5865, 50.847, 51.255],
    # loaded images are already RGB format
    to_rgb=False)

train_pipeline = [
    dict(type='RandomCrop', crop_size=32, padding=4),
    dict(type='RandomFlip', prob=0.5, direction='horizontal'),
    dict(type='PackInputs'),
]

test_pipeline = [
    dict(type='PackInputs'),
]

train_dataloader = dict(
    batch_size=16,
    num_workers=2,
    dataset=dict(
        type=dataset_type,
        data_root='data/cifar10',
        split='train',
        pipeline=train_pipeline),
    sampler=dict(type='DefaultSampler', shuffle=True),
)

val_dataloader = dict(
    batch_size=16,
    num_workers=2,
    dataset=dict(
        type=dataset_type,
        data_root='data/cifar10/',
        split='test',
        pipeline=test_pipeline),
    sampler=dict(type='DefaultSampler', shuffle=False),
)
val_evaluator = dict(type='Accuracy', topk=(1, ))

test_dataloader = val_dataloader
test_evaluator = val_evaluator


# optimizer
optim_wrapper = dict(
    optimizer=dict(type='SGD', lr=0.1, momentum=0.9, weight_decay=0.0001))
# learning policy
param_scheduler = dict(
    type='MultiStepLR', by_epoch=True, milestones=[100, 150], gamma=0.1)

# train, val, test setting
train_cfg = dict(by_epoch=True, max_epochs=20, val_interval=1)
val_cfg = dict()
test_cfg = dict()

# NOTE: `auto_scale_lr` is for automatically scaling LR
# based on the actual training batch size.
auto_scale_lr = dict(base_batch_size=128)


# defaults to use registries in mmpretrain
default_scope = 'mmpretrain'

# configure default hooks
default_hooks = dict(
    # record the time of every iteration.
    timer=dict(type='IterTimerHook'),

    # print log every 100 iterations.
    logger=dict(type='LoggerHook', interval=100),

    # enable the parameter scheduler.
    param_scheduler=dict(type='ParamSchedulerHook'),

    # save checkpoint per epoch.
    checkpoint=dict(type='CheckpointHook', interval=1),

    # set sampler seed in distributed evrionment.
    sampler_seed=dict(type='DistSamplerSeedHook'),

    # validation results visualization, set True to enable it.
    visualization=dict(type='VisualizationHook', enable=False),
)

# configure environment
env_cfg = dict(
    # whether to enable cudnn benchmark
    cudnn_benchmark=False,

    # set multi process parameters
    mp_cfg=dict(mp_start_method='fork', opencv_num_threads=0),

    # set distributed parameters
    dist_cfg=dict(backend='nccl'),
)

# set visualizer
vis_backends = [dict(type='LocalVisBackend')]
visualizer = dict(type='UniversalVisualizer', vis_backends=vis_backends)

# set log level
log_level = 'INFO'

# load from which checkpoint
load_from = None

# whether to resume training from the loaded checkpoint
resume = False

# Defaults to use random seed and disable `deterministic`
randomness = dict(seed=None, deterministic=False)
간략하게 살펴보면
현재 모델의 경우, mmpretrain 에서 지원하는 CIFAR10 모델과 그에 따른 config 파일이라 수정없이 사용했다.
하지만 custom 데이터를 사용한다면 아래의 부분을 중점으로 변경이 필요하다.
model settings 의 경우,
backbone, neck, head로 구성되어있고,
model.type 은 'ImageClassifier' 이다.
head.num_classes=10 이다. custom 데이터셋을 사용하는 경우, classes에 맞게 수정해준다.
datas settings 의 경우,
dataset_type = 'CIRAR10' , num_classess = 10 이 부분을 필요에 맞게 수정해줘야한다.
train_dataloader, val_dataloader 에서는
batch_size, num_workers, data_root 부분을 수정해 주어야한다.
optimizer, learning policy 의 경우,
필요에 따라 type, lr, momentum, weight_decay 부분을 수정한다.
train, val, test settings 의 경우,
max_epochs, val_interval 부분을 수정한다.
Train
일단 큰 수정없이 아래와 같은 명령어로 학습을 시켜줬다.
python tools/train.py config_work/resnet18_b16x8_cifar10_config.py
결과 dir 지정하지 않았다면, work_dirs/모델명 으로 결과에 대한 파일들이 생성된다.
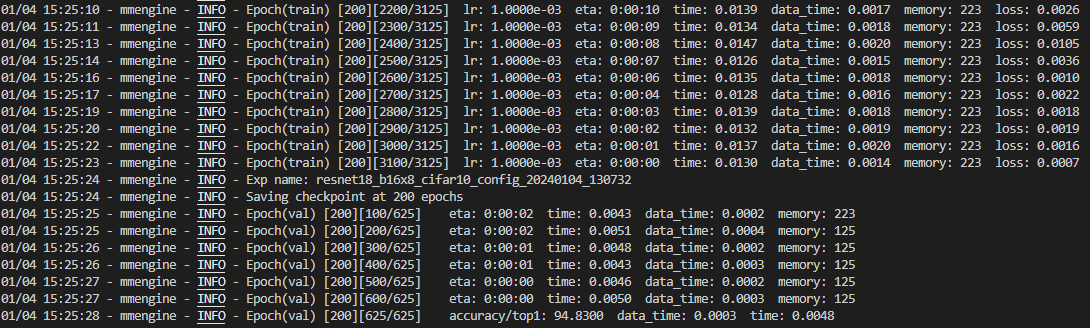
아래는 vscode의 실행 결과 화면이다.
accuracy/top1 : 94.83의 결과가 나왔다. 홈페이지와 같은 결과이다.
Test
아래의 명령어와 같이 test를 실행해주었다.
옵션은 문서를 참조하자.
# python tools/test.py ${CONFIG_FILE} ${CHECKPOINT_FILE} [ARGS]

python tools\test.py work_dirs\resnet18_b16x8_cifar10_config\20240104_130732\vis_data\config.py work_dirs\resnet18_b16x8_cifar10_config\20240104_130732\epoch_200.pth
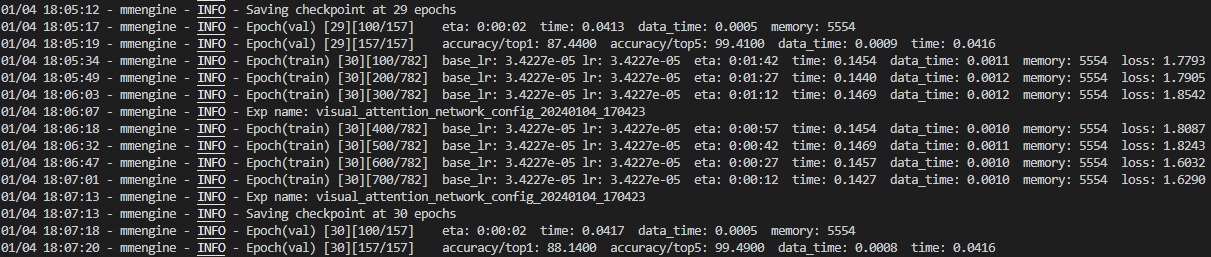
visual attention network tiny 적용
연습으로 다른 네트워크 모델을 적용해 보았다.
정리
1. Check Point 파일 다운로드
2. 실행 Config 파일 생성 및 수정
3. Train 실행
4. Test 실행
Reference
'Two > 영상처리' 카테고리의 다른 글
| mmdetection - tutorial (1) (0) | 2024.01.11 |
|---|---|
| mmdetection 개요 및 설치 (0) | 2024.01.08 |
| mmpretrain 사용법 (4) (0) | 2023.12.31 |
| mmpretrain 사용법 (3) (1) | 2023.12.30 |
| mmpretrain 사용법 (2) (0) | 2023.12.29 |


